Saturday, December 3, 2011

Rabanada (it's what's for breakfast...)


First off, I want to thank Rodrigo Antunes, um Brazileiro living in San Francisco, for this recipe.
He (and for that matter, all of my Brazilian friends) always gives a willing hand if I have a question or need some help with anything that has to do with Brazilian culture, history or cooking.
Last week, I decided it would be fun to devote the next few weeks to holiday cookies and figured that every country and culture has it's own specialty when it comes to Christmas or Hanukkah. The first person I hit up for a family favorite recipe was my friend Erick who lives in Brazil. He responded by telling me that they didn't have Christmas cookies there...
What? That couldn't be right. He must have misunderstood or was trying to be funny. But as it turns out, baking cookies for Christmas seems to have bypassed Brazilian culture in spite of the
influx of people from Germany and Italy, two countries where making cookies is almost a prerequisite for citizenship. Not to worry, though. The Brazilian has a sweet tooth and it's no wonder considering their history of sugar cane plantations and the number of sweet concoctions I see everyday just showing up on my Facebook and Twitter pages from the recipe sites of which I am a member. But getting back to sweets associated with Christmas...
A Christmas morning breakfast item, rabanada (pronounced ha-ba-na-da in Portuguese) came up more than once and I was curious as to what it could be. But before I had a chance to Google it, Rodrigo had already sent me a link to a recipe for it in English. Yes, I know this looks like the same old French Toast we are all used to but this goes beyond the quick milk and egg dunking and introduces some typical Brazilian ingredients like sweetened condensed milk, something found in many a Brazilian sobremesa. Also, instead of the quick dip, this calls for the bread to soak overnight much like a strata. But the similarity stops there; whereas a strata is baked these slices on saturated bread are deep fried. I must confess that I have not made these yet but am looking forward to it. If they are anything like the other Brazilian food I've made, I will not be disappointed.


1 medium sweet baguette or 1 medium sourdough baguette
3 large eggs
3/4 cup sweetened condensed milk
6 tablespoons whole milk
1/2 teaspoon vanilla extract
1/2 teaspoon kosher salt
1/2 cup granulated sugar
1 tablespoon unsweetened cocoa powder
1/4 teaspoon ground cinnamon
3 -4 cups vegetable oil (for frying, estimated)

Rabanada

1
Cut bread into 1-inch thick slices on the bias. You should get about 16 pieces. If you have more, adjust other ingredients to compensate.
2
Whisk together the eggs, condensed milk, whole milk, vanilla extract, and salt until well mixed.
3
Coat bread slices on both sides in the egg mixture, and place coated bread in a shallow pan or pie plate, add any remaining egg mixture to it. Cover with press and seal wrap or foil and place in the refrigerator to soften overnight.
4
Mix together sugar, cocoa and cinnamon in a small shallow bowl big enough to hold one slice bread.
5
Heat oil in a deep skillet to about 2-inches until it reaches 330F (use a candy thermometer to check).
6
Lift the bread from the egg mixture until it stops dripping, and pan fry the pieces in the skillet on both sides until golden and crispy. Keep the oil hot while frying (check temp), raising the heat if needed.
7
As the pieces are removed from the skillet, drain on paper towels then dredge in the spicy sugar mixture.


Tuesday, November 29, 2011

Haleem from American Masala


The first thing that comes to mind when thinking about this recipe from Suvir Saran's last book, American Masala, is true texas chili. You know the kind I mean. Chili that does not hold back on flavor and heat, that brings a pleasant fire to one part of the mouth while the sweet flavor of familiar spices sing a chorus in another , that only asks for the added sweetness of some red onion and perhaps some bread to enhance the texture and flavor. And while the two renditions share many of the same flavors--onions, garlic, chilies and cumin are noticeably present--the execution and other ingredients make this chili stand out from your typical bowl of red.
When I first started reading the directions for cooking this wonderful dish from the muslim community of northern India, I smiled to myself as one does when an old friend shows up unexpectedly. Hearkening back to his first book, Indian Home Cooking ,Suvir Saran directs the cook to use whole spices in this as he does many of the recipes in that first collection of gems. I must confess that this practice put me off at first. Crunching down on a cardamom pod or whole clove was certainly something out of my midwestern comfort zone. However, what began as a nuisance gradually became a pleasure, a part of the experience, a nice surprise instead of a bother. And now I find myself enjoying the same delights with this "chili" as well. But perhaps even more than that is the additional flavors that take this in a dervishly different direction.
When looking at the word chili, which appears in quotes, one of the first ingredients that comes to mind is tomatoes. How can you call anything chili (quotation marks or not) if tomatoes are not involved? The final taste and texture assured me that none were needed. The traditional Indian spices one uses in Haleem more than makes up for the missing tomate we are at home with in our more familiar versions. And, in fact, they would get in the way of the lovely cardamom, cloves and fresh ginger which finds their way into this exotic bowl of heat* and perfume,
a bowl which, I found, pairs with a good many things besides a wedge of pita and some red onions and cilantro as pictured in the book.
As I am the only carnivore in the house (except for the cat and dog), I found myself with lots of leftover haleeem with which to get creative so I thought I would give my old leftover chili con carne concoction a makeover and was very pleased with the result! While living in Houston, I learned a trick from the Mexican dishwashers who always made the same breakfast for themselves which consisted of fried tortillas topped with eggs, chili, and cheese. This has been a standby for me for years. But why not haleem in a similar dish? Two over easy's topped with red onion on a bed of haleen with sides of guava and dwarf banana proved to be a very delicious breakfast this morning. (Hmmm thinking the same tomorrow with a crumbling of cotijo cheese)
Another tasty bite involved a baked pita wedge topped with some chili, red onion, yogurt (Greek style is best here) and a few strips of fresh mango. My dinner from the other night. I can see this as part of a Super Bowl Party buffet. (Or any buffet, for that matter....)
Can a stuffed omelet be far behind.....

*I use the term 'heat' loosely. Of course, you may adjust the heat to your (and your other diners) liking.

Friday, November 25, 2011

Cranberry Margaritas


Growing up in an evangelical home, holiday beverages were limited to eggnog sans any kind of alcohol. Oh yes, and something called Sprite and Spice which was the soft drink put out by Coca Cola that came with a packet of mix that you made a punch with. Without getting into a treatise on religion here, I will say that those days are long gone and I now enjoy my life guilt- and brimstone-free and can enjoy one of these cocktails which use whole cranberries as well as cranberry juice. This particular recipe appeared in Sunset Magazine two years ago.


Cranberry Margaritas

1 1/4 cups cranberry juice cocktail, divided
1/2 cup sugar, divided
1 1/2 cups (6 oz.) fresh or frozen cranberries, rinsed
3/4 cup fresh lime juice
3/4 cup tequila
1/2 cup orange-flavored liqueur, such as Cointreau
3 cups coarsely crushed ice

1. Pour 1/4 cup cranberry juice into a shallow bowl. Pour 3 tbsp. sugar onto a plate. Dip rims of 4 to 6 widemouthed glasses (6 to 8 oz., suitable for margaritas) into juice, then sugar. Set glasses aside.
2. Reserve 12 cranberries. In a blender, whirl the remaining cranberries, cranberry juice, and sugar, the lime juice, tequila, orange liqueur, and ice until smooth and slushy. If necessary, blend in 2 batches, then mix together. Divide among glasses and garnish with reserved berries, skewered on toothpicks.

Monday, November 21, 2011

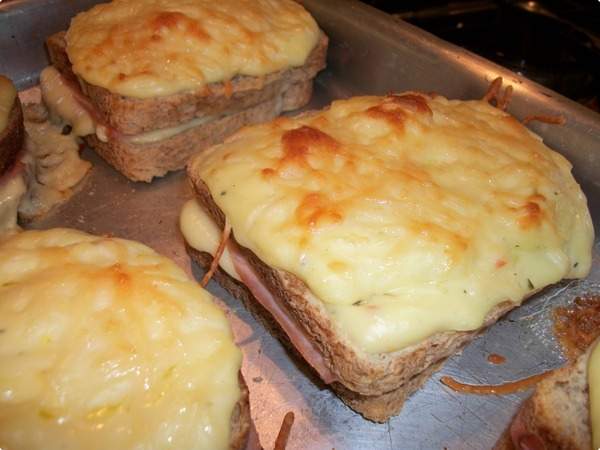
Baked Turkey Sandwiches


Finally, our quick fix from last week. This recipe is based on one from a Brazilian recipe site that I frequent. The original calls for smoked turkey, which you can certainly use if you like, but I thought some leftover slices from the Thanksgiving turkey would be fine. A slice of boiled ham would not be amiss, either!


Baked Turkey Sandwiches

12 slices of bread
12 slices of mozzarella
12 slices of turkey breast
Béchamel using 2 cups milk, 6 tablespoons butter and 6 tablespoons flour
Grated Parmesan cheese to taste
method of preparation

On a baking sheet, place 6 slices of bread.

On each place 2 slices of mozzarella cheese and 2 slices of turkey breast.

Cover each with the other slice of bread.

Top with béchamel.

Sprinkle the grated cheese.

Bake in a 350°F preheated oven for 20 minutes or until golden


Sunday, November 20, 2011

Pequi Rice


I must admit when I bought that jar of preserved pequi last month at the Brazilian market in San Francisco, that I was afraid to open it based on what a couple brasileiros had told me. Erick, my friend in Brasilia who hails from the Cerrado (say-hah-doo) where pequi is grown, tells me that he not only doesn't like the taste but also can't stand the smell of it. When his family makes this rice, they make a separate one for him....(Between you and me, I think Erick is a little spoiled but I would never tell that to him.....rs) My friend, Rodrigo, who lives in San Francisco and runs a business called Adventures In Brazil, claims it to be the worst tasting thing one could ever eat. So you can understand why, with all the negative reviews--another friend, Felipe, from Amasonas (Amazon) and had never even heard of it so could not comment one way or another--I was hesitant to even open the jar lest I should be repulsed by the stench thinking about what Erick had said. But my miserly ways rose above the opinions of others. (The jar had cost nearly $15 and I was not about to toss it out.) I will admit the odor that emanated from it upon my opening it was different but not in a bad way.
One of those familiar-but-I-can't-place-it sort of odors. Astringent yet earthy. I used the amount suggested in the recipe, several tablespoons for each cup of rice, as I didn't want just a little hint but the full on flavor of what it was supposed to taste like. That was a few weeks ago and I will have nothing else with my beans and stews. It is an ingredient I love as much as hot sauce and dendê. (OK, not as much as dendê which is my ingredient discovery of the year!)
Here is the recipe for pequi rice, one I hope you will try.

Pequi Rice

1 cup rice
1 half onion, chopped
1/4 cup pequi, minced
2 tablespoons vegetable oil
1 teaspoon salt,
2 cups hot water

Rinse rice in several changes of cold water to remove excess starch. Drain in a sieve for 1o minutes.
Heat oil in sauce pan and saute onions and pequi until soft. (Do not let brown)
Add rice and cook, stirring, until the rice achieves a white chalky hue.
Add water and salt and cook stirring until much of the water has boiled out but rice is still quite wet.
Remove from heat, cover and let sit for 15 minutes. Fluff with fork.

Thursday, November 17, 2011

A Side and Rolls to Die For!


The rolls pictured on the left are the large size version of the recipe which is not only easy but also very delicious. The hardest part is kneading which can also be done in a bread machine or a stand mixer with a hook. However, I really find kneading dough a very meditative ritual. It is almost yogic in nature when you feel the rhythm of the the stretching, kneading, turning.... But if you must....
This is a recipe I got online but part of the method is from my Great Aunt Ruth, a fabulous country cook from Wisconsin who I will also remember for the wonderful rolls, homemade preserves and ability to make you feel as if you were there permanently. And it's true that we never wanted to leave when we had to go back to Michigan after our annual summer visits.
Do yourself and your guests a favor this Thanksgiving and leave the brown-n-serves where they belong.....on the shelf of the grocery store..rs


Whole Wheat Rolls

2 (.25 ounce) packages active dry yeast
2 cups warm water (110 degrees to 115 degrees)
1/2 cup sugar
2 teaspoons salt
4 1/2 cups all-purpose flour, divided
1 egg
1/4 cup vegetable oil
2 cups whole wheat flour
Directions

In a mixing bowl, dissolve yeast in water. Let stand 5 minutes. Blend in sugar, salt and 3 cups all-purpose flour at low speed until moistened; beat 2 minutes at medium speed. Beat in egg and oil. By hand, gradually stir in whole wheat flour and enough remaining all-purpose flour to make a soft dough. Turn out onto a lightly floured surface. Knead until smooth and elastic, about 6 to 8 minutes. Place in a greased bowl, turning once to grease top. Cover and let rise until doubled or cover and refrigerate overnight. Punch dough down and form into dinner-size rolls. Place on greased baking sheets for plain rolls or knots, or in greased muffin tins for cloverleaf rolls. Cover and let rise until doubled, about 1 hour for dough prepared the same day or 1 to 2 hours for refrigerated dough. Bake at 375 degrees F for 10 to 12 minutes or until light golden brown. Remove from oven and cover with a clean kitchen towel for 15 minutes. Serve warm. If desired, dough
may be kept up to 4 days in the refrigerator. Punch down daily.

I hope if you are one of the people who bring the canned yams with the marshmallows on top every year to the Thanksgiving Dinner that you will delightfully surprise the other diners by taking the sweet potato to new heights by making this delicious, yet simple, soufflé. I promise you will be asked to bring this time and again. (You don't have to tell them where you got this. Tell them you made it up.....rs)

Sweet Potato Soufflé


2 1/2 pounds yams, baked, peeled and mashed
2/3 cup sugar
2 eggs
1/2 cup milk
1 1/2 teaspoons vanilla

Preheat oven to 400°F

Mix and pour into a buttered baking dish and top with the following:

1/2 cup brown sugar
1/4 cup flour
1/2 cup chopped pecans
2 tablespoons butter

Bake for 30-40 minutes.

Wednesday, November 16, 2011

Thanksgiving Starters


If you didn't catch the last edition of Hoos Cookin' you're probably wondering what the ingredients for stuffing is doing in a blog titled, Thanksgiving Starters. The answer to that mystery will be revealed soon but first I want to share a very delicious dip that, like other offerings, has become a tradition for the holidays.
There are many versions of hot artichoke dip out there. This is the one I use and is a must during the holidays!


Hot Artichoke Dip

1 can (14-oz) artichoke hearts, drained and chopped coarsely
1 small can diced mild chilies
1 cups mayonnaise
1 cup freshly grated Parmesan cheese

Mix all ingredients and bake at 325°F in an even proof bowl until bubbly.
Serve with crackers or toasted pita wedges.

Several years ago I happened to be at a local market during the judging of a stuffing recipe for Thanksgiving. I don't remember who won but I do remember this recipe for stuffing-turned-appetizer because I think I have made it every year since. It comes from a local family-Mada-and is simply called The Mada Family Stuffing. The hardest part of this is pulling the bread apart. Get some clean extra hands to help!

Mada Family Stuffing

1/4 pound imported provolone, diced in 1/3-inch cubes
3 hard cooked eggs, chopped
1 cup hard salami, diced in 1/3-inch cubes
2 beaten eggs
1/3 cup flat leaf parsley, chopped
2 loaves day-old Italian bread
1 teaspoon red pepper flakes
Milk, enough to just moisten the bread
Salt and pepper to taste
4 tablespoons butter, melted and slightly cooled but still pourable

Preheat oven to 350°F

Remove crust from bread.
Tear into small pieces and place in a large bowl. Add milk to just moisten.
Add the rest of the ingredients and mix well with hands.
Make into walnut-size balls and bake on a baking sheet for 20 minutes or until they start to turn golden.